How to Record Audio on Google Slides (3 Useful Ways)
For a variety of reasons, Google Slides has surpassed PowerPoint (along with Apple's Keynote). It’s an easy-to-use online tool that can help you create and format presentations. It’s completely free and user-friendly for starters but enables collaboration among people or teams. Google Slides allows almost anybody to produce a terrific presentation, whether it's to complete a commercial transaction, boost your chances of promotion, or assist students to understand a hard subject.
Some people may want to add audio or record a narration of their Google Slides to enhance the effect of the working or make the present more active. However, Google Slides does not provide audio recording capabilities, but we still have many simple and quick ways to add recorded audio to Google Slides.
Today we'll teach you how to record audio and put it on google slides step by step. Remember to get your slide and operating device ready, and let’s begin now!
How to Record an Audio for Google Slides?
As there is no convenient built-in recording function in Google Slides. The only method we can use to add audio to a Google Slides is to record the audio separately by another software, then save it to your device, and insert it into a slide.
So, how to record audio on your computer? Here we will introduce you three solutions to record your voice on computers, read and pick one that suits you.
Record Audio via VideoSolo Screen Recorder
It must be said, VideoSolo Screen Recorder is a strongly recommended software when mentioned recording screen activity or audio on your computer. It’s multi-functional software that can capture all computer screen activity and allows you to record only sound generated by your Mac/Windows computer or any external source, or both.
It has feature-rich and plentiful customizable options such as record computer screen with audio, task scheduling, audio output format and quality, hotkey configuration, and so on.
What you hear on your computer will be recorded in excellent quality as well. The built-in recording setting function allows you to record both external and internal sound, such as your voice from your microphone, music, and game sounds. All noises may be encoded and exported as MP3 or M4A audio in real-time. It even has an audio enhancement mode and a preset to eliminate microphone noise to provide high-quality audio.
The program is also very user-friendly. Follow the steps below to record your audio.
Step 1. Connect the Microphone and Launch VideoSolo
If you have an external microphone, plug it into the appropriate jack on your computer and make sure the microphone is turned on.
Install VideoSolo Screen Recorder and open it.

Step 2. Select "Audio Recorder" and Toggle on the Microphone
Tab "Audio Recorder" from the main interface. To begin, turn on the microphone and adjust the sound volume using the sliders below. To record system sound from output devices while recording the microphone, toggle the first button so that your computer may collect sound sources simultaneously. Please capture the microphone sound in a quiet location for optimal output quality.

Because of Mac system constraints, you may install an audio driver before recording audio in the Mac version. The procedure takes only a few minutes.
Step 3. Preset the Audio Quality and Output
Before you begin recording voice, you should configure your audio by clicking on the gear-shaped icon. Slide down to the output area and select the desired audio format (WMA, MP3, M4A, or AAC) and quality (from "Lowest" to "Lossless"). By hitting "OK" to save your settings.
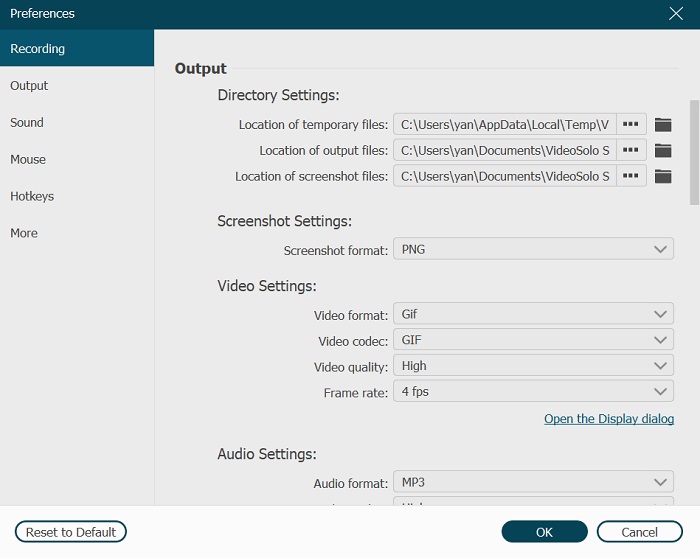
There are additional audio output types to choose from in the Mac version (MP3, M4A, WMA, CAF, FLAC, OGG, and OPUS).
Step 4. Start Audio Recording and Save It
When you're ready, press "REC" to begin recording your voice using a microphone. When you've finished your speech, just hit the Stop symbol to terminate the recording. After previewing, save it to a chosen save path.
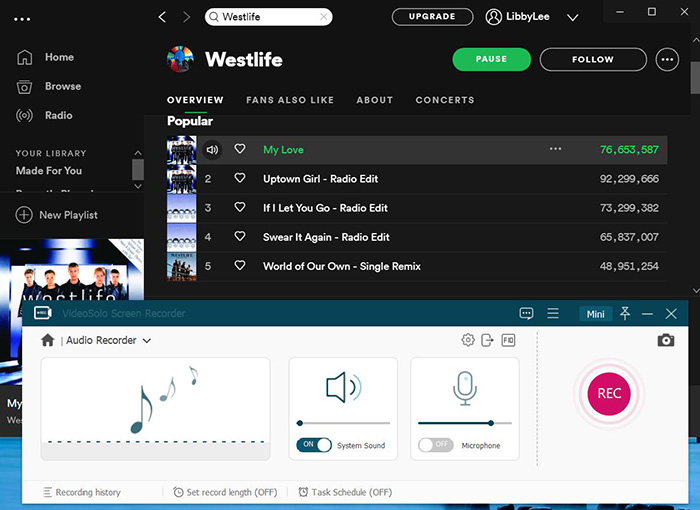
You may now quickly enjoy your recorded audio file on your computer. For VideoSolo Screen Recorder, you can even choose to record your voice when doing the presentation and also edit your voice clip after the recording. Also, not limited to audio recording, VideoSolo Screen Recorder can also record webcam, and do fluently game recording. You can even record your lecture or class if you are a teacher and when to give students a tutorial video.
Record Audio using Computer Built-in Software
And there’s also a simple approach for you to record external sound. Utilize the built-in Windows/Mac application to record the audio. All you have to do is enable your computer's microphone and record your voice. However, you should be aware that this application only works for microphone recordings and does not capture any internal audio playing on your computer, and you can’t do editing, enhance or add effects after the recording.
Voice Recorder for Window:
Step 1. Go to "Start > All > Programs > Accessories" and type "Voice Recorder" in the search box on the bottom left corner.

Step 2. Click the "Start Recording" button to begin recording the microphone sound, you can start speaking through the microphone.

Step 3. Click the "Stop Recording" button to stop recording

Step 4. If you have finished, click the Stop symbol in the center of the screen. It is instantly saved to the recording list.
QuickTime Player for Mac:
QuickTime, like Voice Recorder, is a built-in software in Mac. It allows you to rapidly record your voice on Mac using a microphone.
Step 1.Go to the "Applications" folder on your Mac, search "QuickTime Player" and open it.
Step 2. Click "File > New Audio Recording".

Drop the down arrow beside the middle recording button. You may customize the sound input (microphone) and quality settings. Drag the slider at the bottom to change the volume.

Step 3. Tab the red record button to begin recording and the black one to stop recording.
Go to "File > Save As" to save your recorded file to the desired location.
These ways make it incredibly simple to record your voice on your computer using a microphone. These recorded files, however, are not of the same quality as those generated by professional audio recorders, and the output formats are fixed. Worse, you can't record computer audio as well as your own voice at the same time. If you are more concerned with voice quality and format, VideoSolo Screen Recorder should be your first choice.
Record Audio through Online Recording Tool
If you don’t know to download any software but record your audio with a recording tool, you can use this online recording tool that works on Chromebooks, PCs, and Macs, check out the Online Voice Recorder.
Step 1. Go to the site of Online Voice Recorder.
Step 2. Click the Record Button to start recording and the "Stop" button to finish recording.

The first time you use the site, you must grant it permission to use your microphone.
Step 3. You can listen to and preview your voice recording and cut the audio clip if necessary. Then click "Save" to download your audio file.
If you're using a Chromebook, you may have the file saved straight to Google Drive by adjusting the "Downloads" option in the Chromebook settings.
With this online tool, you can record your voice through the microphone quickly and easily, but it does not support recording the sound from your system and the output format only provide the MP3 file. Also, the online tool’s operation depends on your network condition, if your internet is not so good, the recording may have some lag. If you want to record your voice and system sound simultaneously and output the file with different formats, try using professional recording software like VideoSolo Screen Recorder.
How to Add Audio to Google Slides?
You may now add your audio to Google Slides after recording it with one of the tools we introduced above. After you've accomplished recording, you may upload audio from your Google Drive to Google Slides as follows:
Step 1. Upload your audio file to Google Drive
Before adding the recording to Google Slides, you need to upload it to Google Drive first for later utilization.
Go to your Google Drive, click the “New”, and select “File upload” to upload and save your audio files.

Keep in mind! If you want to share this slide deck with your students or anybody else who will need to listen to the audio file, you must share it independently from Google Drive. To enable this, you can right-click the file in Google Drive and select Share.
Step 2. Insert your audio into your Google Slide
Open your Google Slides file or start a new one. Choose the slide into which you wish to place the audio file. Then click Insert > Audio. Select the correct file from your Google Drive.
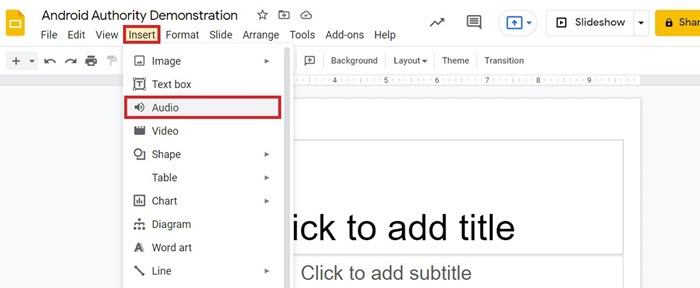
A speaker button will display on your slide when you select the file and insert it. To play the audio, you can click on the icon or move the button to the place you want to put it on the slide.
Step 3. Adjust the audio format option in your Google Slide
Once your audio file has been added to the slide, pitch on the audio icon, and you may select “Format options” in the toolbar. A sidebar menu will open, displaying several playback choices.
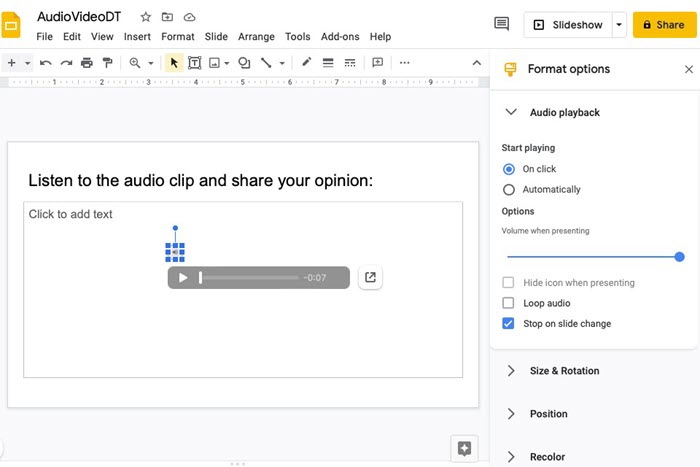
You have the option of having it play "On click" or automatically when you display that slide.
If you want it to play automatically, you may also conceal the symbol because you won't need it shown on the screen. You can also adjust the volume of the audio or set the audio to loop so that it plays again and over. If you don’t want the audio to continue to play, check the box "Stop on slide change," and then it will stop playing when you change slides.
Now you can preview and play the audio by clicking the speaker symbol to play in presentation mode.
Conclusion
| VideoSolo Recorder | Online Voice Recorder | Built-in Software | |
| Record audio on computer | √ | √ | √ |
| Record system sound | √ | × | × |
| Select output format | √ | × | × |
| Output quality choosable | √ | × | × |
| Recording editable | √ | √ | × |
We can see from the table that all three methods can record your audio on your computer. But for the built-in software and online tool, sound from the computer system cannot be recorded, and the output format and quality cannot be customized either.
So, if you don’t consider the quality and format of the audio and just want to record your voice in a very quick way and not do any adjusting or editing for your audio file, you can choose Online Voice Recorder or the built-in software on your computer.
However, if you want to record your audio and system sound simultaneously in high quality, and with a different output format, edit the audio file after recording, then you should choose a professional recording software such as VideoSolo Screen Recorder we recommended above.
You may record any audio on your computer with VideoSolo Screen Recorder, including internet streaming music, radio, BGM in games, music in anime, and songs from Spotify/Apple Music. Now is the time to download this powerful recording tool and give it a try!
FAQ about Recording Microsoft Teams Meeting
Can I record my Google Slides presentation with my voice?
Google Slides does not have a built-in voice recorder and does not support recording your slides presentation with your voice in real-time. But we can record the presentation with voice and system sound with the help of VideoSolo Screen Recorder. As we mentioned above, this software can record your screen activity with both the microphone voice and the system sound. So, you can use it to make a full screen recording for your presentation with your voice.
You can read this post to get more detail on How to Record Computer Screen on Windows & Mac.
How can I Share My Recording with Others?
Well, you can choose any of those three solutions we mentioned above to record your audio. You can save your audio file on your computer and share it with others through email or other transmission methods. Or you can upload your recording to your Google Drive then right-click to share the link with others.
By using VideoSolo Screen Recorder, it offers a variety of format and codec options to fulfill a variety of needs. The most prevalent video codecs are H.264 and H.265. Video output formats include MP4, WMV, MOV, F4V, TS, and AVI. MP3, M4A, AAC, and WMA are among the audio formats supported. Furthermore, you may easily produce GIFs or screenshot photos to share with your pals. By default, all media files will be stored in high quality and will be compatible with any popular digital device. So, you can share your recording with others without striking a blowing.

