How to Convert PowerPoint to Video (3 Useful Ways)
PowerPoint is a very efficient way to do a presentation and demonstrate your work. But when it comes to the case that you want to post your files on social networking or video-sharing websites like YouTube. Or you want to secure your presentation from being modified and repackaged by others. Well, you can choose to convert your PPT to a video for better sharing and watching.
But how can you make your PPT into a video? Today we'll show you 3 useful ways to generate a PowerPoint presentation to a video file step by step. You can read and select the method that suits you. Remember to get your slide and computer devices ready first. OK, let’s begin now!
How to Convert a PowerPoint to a Video in Microsoft?
When you record a presentation, you may want to keep all of its elements including the narration, animation, pointer movements, and timings you already set in the presentation. For this, here’s the most convenient and effective way to convert your PowerPoint into a video in Microsoft directly.
Check the following tutorial for generating a PPT to a video in Microsoft with different devices.
Generate a PowerPoint Presentation to a Video on Windows
To convert your slide show to a video file on a Windows device, the only thing you need to do is to open your PowerPoint presentation with Microsoft and follow the steps below:
Select File > Export > Create a video.
Select the Quality and if you want to Use Recorded Timings and Narrations.
Set the default time and click “Create a Video”
Enter a File Name and select the Saved Location.
Select the Video Format in the Save As type box. Click “Save” to generate the video.
Here’s a more detailed processes instruction for your reference:
Step 1. Open the PPT file you’d like to convert. Save it first then go to the “File”.
Step 2. Select “Export” and you can see the “Create a Video” session, Click on it.
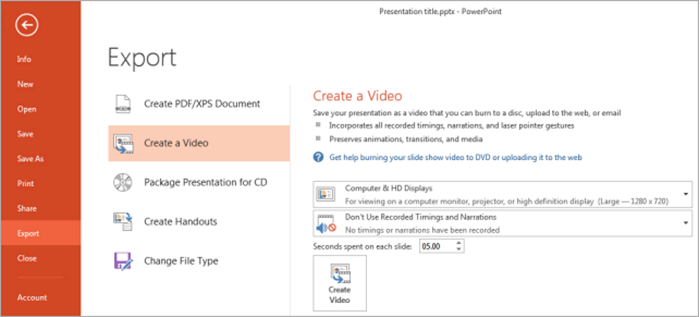
For PowerPoint 2010 and previous versions you should click on the button named “Save & Send”.
Step 3. Then you can see the option of the output quality and other recording settings for your video. Select them at your wish.
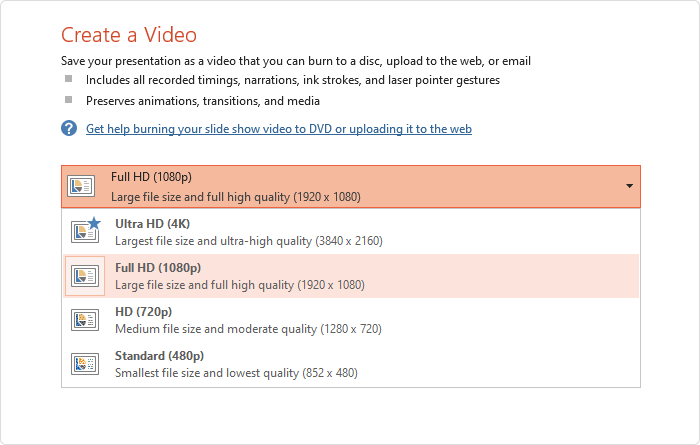
An information you should know is that the greater quality of screen resolution you select, the larger the download size for video. If your data capacity is restricted, you might want to go with a low-quality option.
Step 4. Also, select “Use Recorded Timings and Narrations” if you have timings and narrations and wish to use them in your video presentation.
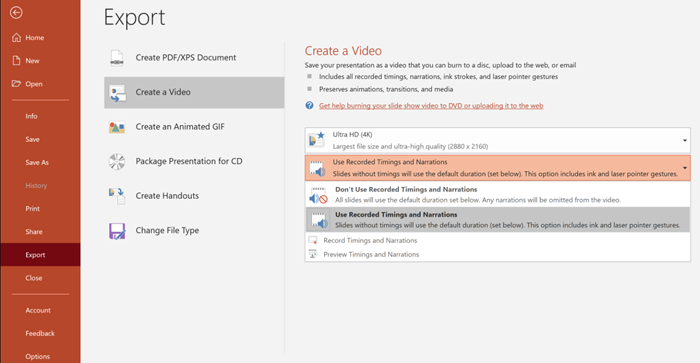
If you see the option doesn't available to be selected, it means you haven't recorded narrations or specified timings in your slide presentation.
Step 5. Set the amount of time you want each of your slides to display. And click “Create Video”.
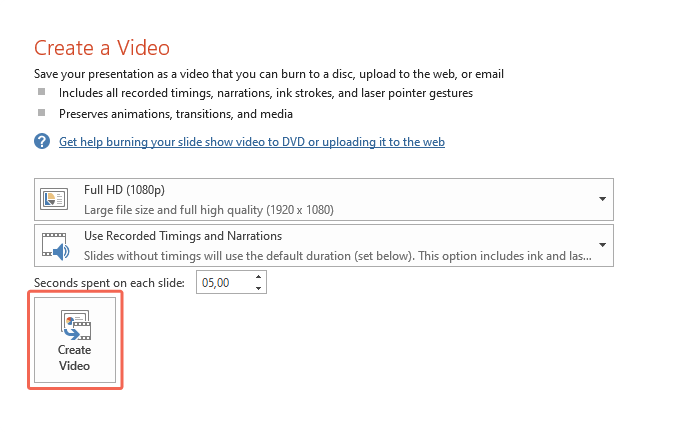
Step 6. Choose the location and video format for your video presentation. PowerPoint supports two video formats: MPEG-4 Video (MP4) and Windows Media Video (WMV).
For the greatest compatibility with video players, the MPEG-4 Video format is suggested.
Wait a few minutes for your PowerPoint video to generate. The time it takes depends on the content of your slides. You can check the progress bar at the bottom to estimate the finishing time. Do not close your file until it is finished.
This method is quick and convenient. However, this function of Microsoft only supports recording the sound from a microphone, which means you can only record the voice but can not record the sound from the system. Also, the embedded media files in your slides won’t play in the video.
So, for Windows users who want to record your slide show with system sound, try out the solution of recording your screen through Xbox Game Bar:
Step 1. Press Windows + G to launch Xbox Game Bar. And navigate to the Settings, then select General to enable the features.
Step 2. Click “Start Recording” to record your PowerPoint playing screen. Or you can press Win + Alt + R to start capturing your screen.
Step 3. While finishing the recording, click the “Stop Recording”.
When the recordings are done, the video will be automatically saved as MP4 files on your computer.
With this method, you can only record the PPT in window mode by using the Xbox Game Bar. If you are doing the recording in slide show mode, then you can’t customize the recording session but only record it in full-screen.
Generate a PowerPoint Presentation to a Video on Mac
For Mac users, you may also save your presentation as a video file to run on computers that do not have PowerPoint installed.
Select File > Export.
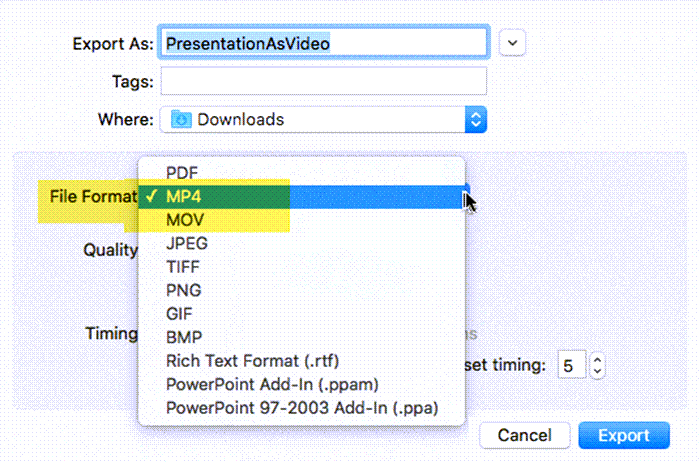
Open the File Format list to select the video format (MP4 or MOV).
Check the box if you want to Use Recorded Timings and Narrations.
Set the default time you want to spend on each slide.
Click “Export” to generate the video.
PowerPoint 2016 for Mac does not enable video saving. This functionality is supported by other versions of PowerPoint for macOS (2011, 2019, and the Microsoft 365 subscription).
More detailed processes instruction for your reference:
Step 1. Open the PPT file you’d like to convert. Save it first.
Step 2. Go to the “File” then click “Export”.
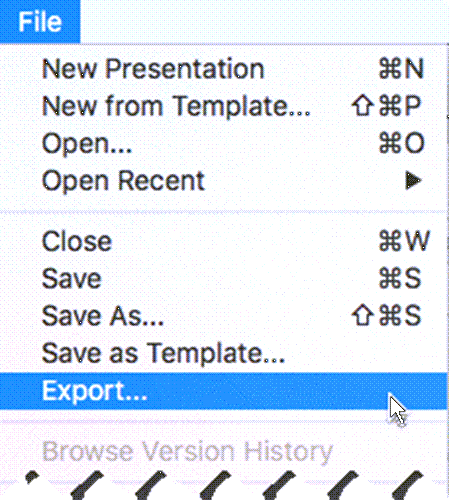
Do not use Save As, because it doesn't offer video options.
Step 3. In the File Format drop-down menu, choose your video format. PowerPoint supports two video formats: MPEG-4 Video (MP4) and MOV.

MOV files are compatible with any application that supports QuickTime movies. MP4 is more widely accepted because it is a global standard, particularly on hardware devices.
Step 4. Select the Video Quality according to your need.
The quality of screen resolution you select may influent your generating time. And the greater quality of screen resolution you select, the larger the download size for video.
Step 5. Check the box next to Use Recorded Timings and Narrations to enable this setting shown in your video. You can also choose to set the amount of time the video will spend on each slide.
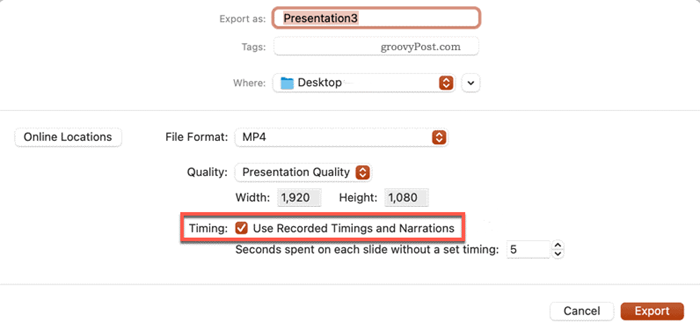
When you export your presentation as a video, the narrated audio that was recorded in your slides will play, while other embedded media files won't play.
Step 6. Name the video and choose the saving location, Click “Export”.
That's all, you can just wait for the converting procedure to complete, and your video presentation will be generated into video.
So these are the ways to make a video from your PowerPoint presentation file, which is very convenient and can output high-quality video. However, there still have some little defects in these methods.
Therefore, if you want to record your PowerPoint with sound which can customize your recording session while recording and generate it into a high-quality video, you may need a better tool to help you do this.
How to Record PowerPoint into Video with Audio via VideoSolo
Here we strongly recommend a powerful PowerPoint video recording tool VideoSolo Screen Recorder. It’s multi-functional software that can capture all computer screen activity and allows you to record computer screen with audio, generated by your Mac/Windows computer or sounds from a microphone, or both.
Conveniently, the video recorder allows you to capture a full screen or a customized area. You may also record from a specific window or record around the mouse pointer.
To meet various demands, VideoSolo presets multiple format and codec options. You can output the PowerPoint video in various formats, such as MP4, WMV, MOV, F4V, TS, and AVI. All media files will be saved in high quality by default and can be compatible with any mainstream digital device. So you can share your PPT video with your colleague or friends or upload it to the online platform in any format you want.
The program is also very user-friendly. Follow the steps below to record your audio.
Step 1. Download and Launch VideoSolo
Install VideoSolo Screen Recorder and open it to enter the interface.
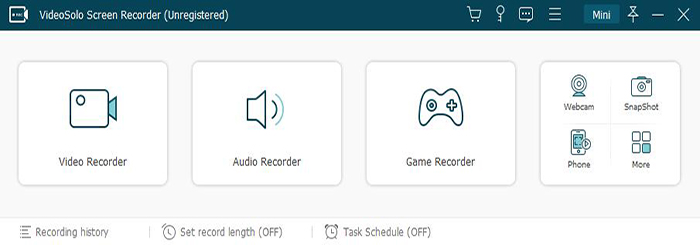
Step 2. Choose "Video Recorder" and Select the Recording Area and System Sound
When you go to Video Recorder, you may record the entire screen or customize it by picking a region/window or some predefined dimensions.
Remember to toggle on "System Sound" after modifying the recording area to set a correct system volume. Remember to switch off the microphone unless you intend to narrate when recording your slide show.
If your recording environment is still not quite enough, and your voice is not big enough, you can try checking the box of Microphone enhancement by clicking the drop-down list in the microphone option. And to prevent making excessive noise, VideoSolo provides the function of Microphone noise cancellation, also by checking the option box as below.

Because of Mac system constraints, you may install an audio driver before recording audio in the Mac version. The procedure takes only a few minutes.
Step 3. Adjust Output and Hardware Acceleration Settings
Before you begin recording, go to "Preferences" by clicking the gear icon on the interface. On the pop-up window, click on the Output tab. Here you can change the location of your output files. Also, you can alter the video output format, video quality, frame rate, audio format, and audio quality. The supported output formats include MP4, MOV, WMV, MP3, AAC, etc.
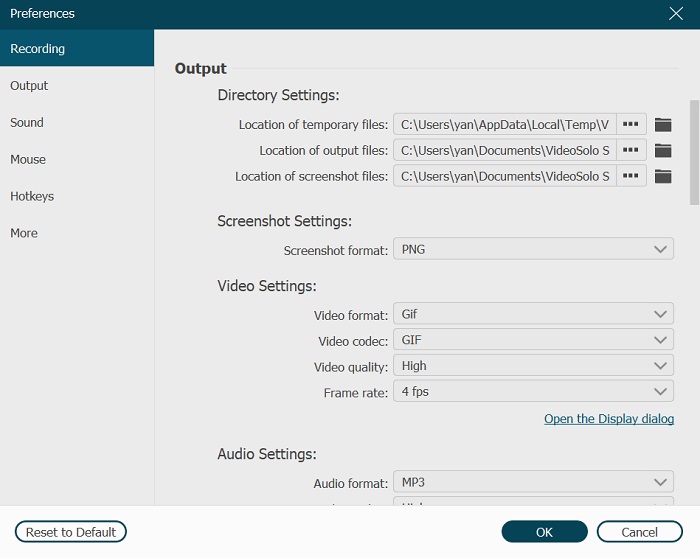
If your computer runs with good performance, you may select 60 FPS for exporting but at the cost of creating a large file. You can also try utilizing video compressors to reduce video file size.
If your computer is regular, you may choose an appropriate format or codec approach to balance image quality and video file size. Many people opt for the MP4 format in that it shows good compatibility, maintains fine details, and delivers a smaller file.
Step 4. Start Recording your PowerPoint presentation
To begin recording a PPT slide in show mode, click the red "REC" button.
When capturing your screen, VideoSolo also allows you to add notes, shapes, and arrows. To open the drawing panels, simply click the Edit button.
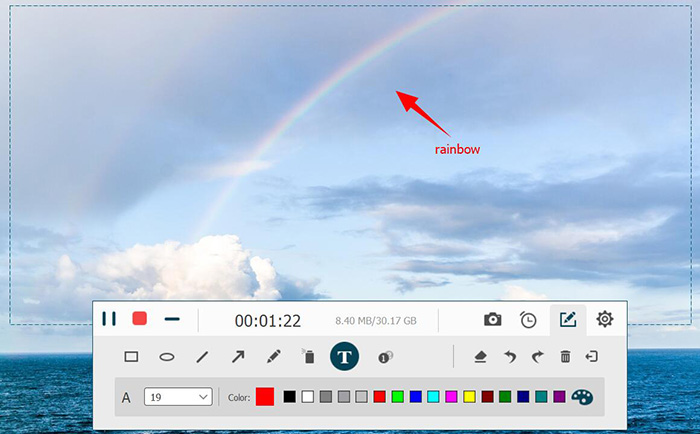
With this function, you can make your words more clear while doing the tutorial presentation or lecture through your PowerPoint slides recording.
For a better view, you can go to "Preferences" (the gear icon) > "Recording" to hide float bar/desktop icons when recording. Then you need to use hotkeys to control the program.
Step 5. Output the Lecture Recorded
Once finishing recording, press the red square Stop button. Then you can quickly preview your recorded slide video on your computer.
If the recording is fine, click "Save" to output the video to your computer. Then you can share it with your students or upload the file directly online.
For VideoSolo Screen Recorder, you can even choose to record your voice when doing the presentation and also edit your video clip after the recording. Therefore, you can utilize it t to record your lecture or class if you are a teacher and when to give students a tutorial video. Also, not limited to slide show recording, VideoSolo Screen Recorder can also record webcam, and do live stream recording. Action speaks louder than words, come and download it now!
How to Make PPT into a Video Free Online?
People who do not want to download the software but still need to convert their PowerPoint slides to high-quality video quickly and conveniently can try to make your PPT into a video via the online tool. You can navigate to ASPOSE Online Converter.
This online tool can help you convert your PowerPoint slides into MP4 by uploading your file to the website.
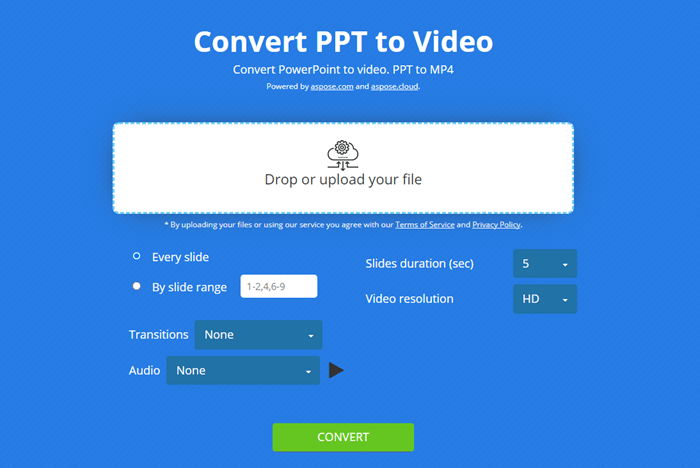
Step 1. Prepare your PowerPoint slide files and enter the website.
Step 2. Upload your slide show files by clicking the white upload box.
Step 3. Adjust the slide's duration and resolution.
You can also select the recording range and the transitions and audio of the slides, but for the transitions and audio, you can only choose the default options which the website offers.
Step 4. Click “Convert” and wait for the presentation to generate into an MP4 video.
Step 5. Click “Download now” while the convert is finished.
Then you can get the video file of your PPT slides, very quick and easy-used. However, this kind of website will convert your file depending on the internet condition, so it may take some time to upload and convert if it is a large file. And the settings of the video are not a wide variety of optional. If you want to record your PowerPoint with sound and output high-quality video in a different format, we suggest you use the professional recording tool VideoSolo Screen Recorder.
The Best Way to Convert PowerPoint to Video
Above we introduce three useful ways to make your Microsoft PowerPoint slides into a video. To assist you in deciding which method is best for you, we've produced a comparison form of these three methods.
VideoSolo Screen Recorder | Microsoft Built-in Recording | Online Converter | |
Can record PPT to video | √ | √ | √ |
High-quality output | √ | √ | √ |
Record customized area | √ | × | × |
Add notes or annotations | √ | × | × |
Record PPT with system sound | √ | × | × |
Edit after the recording is over | √ | × | × |
Save recording files in other formats | √ | √ | × |
Microsoft's built-in converter is convenient to use when you are using the software to create your slide show, but it does not support recording your PPT slide with system sound and can not customize the recording area.
The online converter may be the quickest and most convenient way to convert your slide show into a video when you are in a hurry and do not need any sound record or extra edition in your video. But you still need to make sure your network condition is good while using this tool, and have the patience to wait for the uploading and conversion.
In general, VideoSolo Screen Recorder can be a better choice. It can record your presentation with both system sound and the human voice. The output format and quality can also be various in the VideoSolo's multiple functions. You can share the recording file with others in the formats you want. Furthermore, this screen recorder allows users to enhance recording efficiency by customizing the recording area, and taking annotations while recording, with frequently-used output parameters. You may now download and try it out!
FAQ about Convert PowerPoint to Video
Can I Record My PPT Slides with Face?
Yes, you can. Theoretically speaking, most of the recording tools or converters do not support recording your slide shoe with your face shown on it, but with the multifunctional attribute of the VideoSolo screen recorder, you can enable the Webcam mode while recording your presentation slide show. Just turn on the webcam button before you start the recording. Then you can record your PPT with your face by using the webcam recording.
How do I Convert My Slide Show to a YouTube Video?
YouTube supports many kinds of video upload formats, such as MOV, MP4, AVI, WMV, FLV, etc. You just need to record and convert your PowerPoint into a video using the methods we mentioned above and then upload it to YouTube. We highly recommend using VideoSolo to record and output your slide show video in various formats, as different formats of video can show different resolutions.


